Axle Assembly
Start with the completed ōSeat Assemblyö.
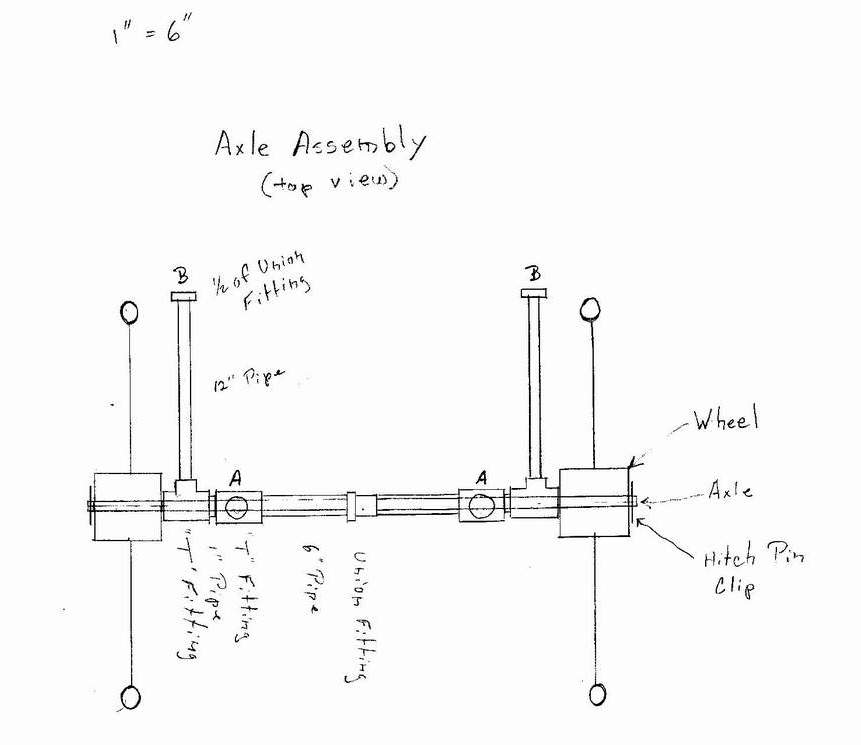
Note the ōTö fittings on the drawing marked ōAö, these are the ōTö fittings at the bottom of the ōSeat Assemblyö.
Parts:
ōTö Fittings 2 ea
6 inch pipe 2 ea
1 inch pipe 2 ea
Union Fitting (complete) 1 ea
12 inch pipe 2 ea
1/2 Union Fitting 2 ea
First disassemble the complete union fitting. Screw each half of the union fitting to the end of one of the 6 inch pipes. Screw the pipes to the inside of the ōTö fittings marked ōAö and then screw the union fitting together.
On each side of the assembly screw one of the one inch pipes to the outside of the ōTö fitting marked ōAö. Next screw a ōTö fitting to the one inch pipe.
Screw one of the 1/2 union fittings to each of the 12 inch pips and screw the pipes to the ōTö fittings on the ends of the assembly. The 12 inch pips should be angled upward to meet the parts from the ōFront Assemblyö which will be described in another drawing.
Installing the axle and wheels.
There is no drawing of this procedure.
The inside diameter of the ōTö fittings at the outer ends of the axle assembly is larger than 3/4 inch. In order to support the axle at this outside end, screw an extra pipe of any length into the ōTö fitting. Cut this pipe off flush with the outside end of the ōTö fitting with a hack saw. File off any burrs or sharp edges left from the saw. Using the other end of the extra pipe repeat the process for the other end of the axle assembly.
Insert the axle into the axle assembly. Install a 3/4 inch washer at each end. Install the wheels at each end. Install one more 3/4 inch washer at each end. At this point there should be approximately 1/2 inch of axle protruding from each end of the assembly with the wheels and washers installed. If there is less than 1/2 inch of axle protruding some of the fittings may need to be tightened or one of the 6 inch pipes in the axle assembly will have to be replaced with a 5 inch pipe.
Once the desired protrusion is obtained, center the axle in the assembly and mark each end of the axle at the point of the last washer. Remove the axle and at a point beyond the mark drill a 1/8 inch hole through the axle. Make sure not to drill the hole to close to the mark, the hole is for a pin which will secure the whole assembly together.
The pin is called a ōHitch Pinö and looks like a large hair pin. This item is found in most hardware stores. Choose pins where the diameter of the wire used to make the pin is 1/8 inch. Two such pins are required.
Reinstall the axle, washers and wheels. Then using the hitch pins secure the whole assembly.
|
|
Page 3 of 6