Seat Board Assembly
This set of instructions assumes that the builder will use the seat form Northern Tool Co. If the builder uses a different seat then adaptations of these instructions must be made.
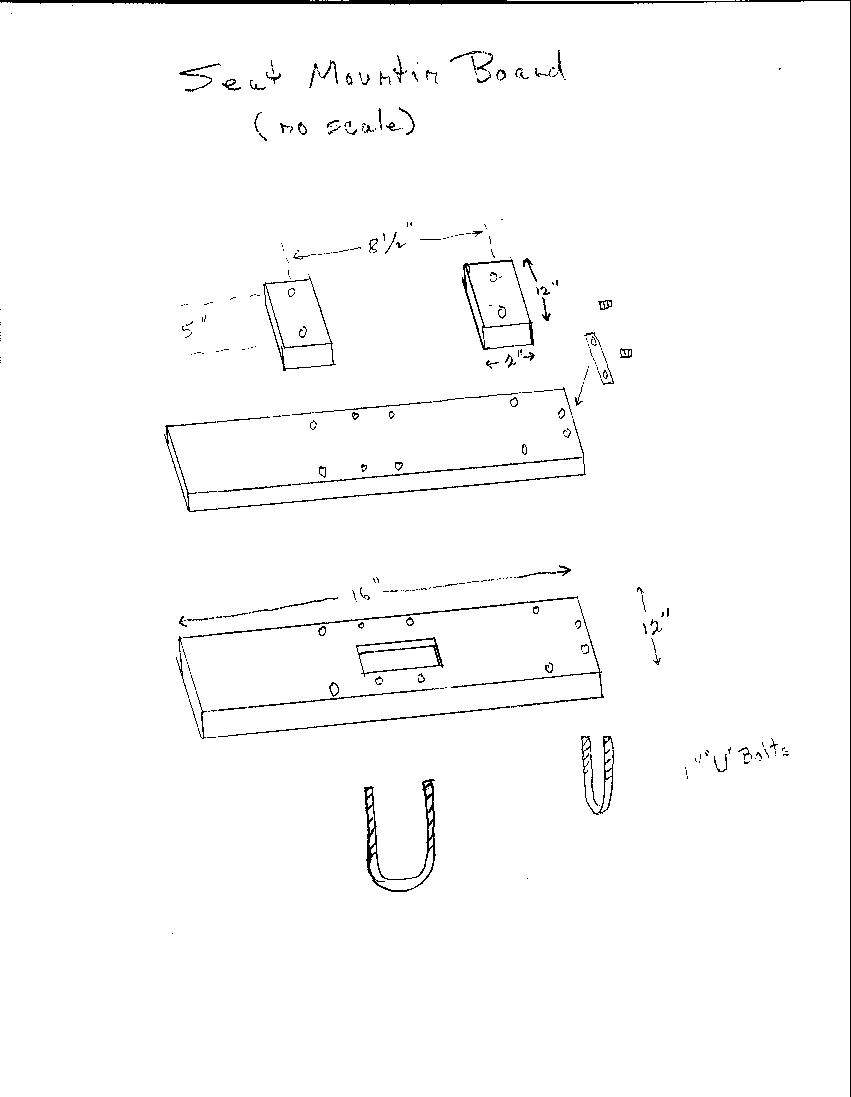
The seat is equipped with two sets of mounting holes. Use the ones which measure 5 inches by 8 1/2 inches.
Lumber used for the seat board is 3/4 inch plywood. Four pieces are needed: two pieces measuring 12 inches by 2 inches and two pieces measuring 12 inches by 16 inches.
A hole will need to be cut in one of the 12x16 pieces. This hole is to allow clearance for the center “T” fitting of the seat assembly.
Three “U” boles are used to attach the seat board to the seat assembly. These bolts need to have a length of 3 inches. One inch to go around the pipe, one and one half inches to go through two of the plywood boards and one half inch to allow for attaching the baker plate or washers and the nuts. The width of the “U” bolt can vary, so long as it is large enough to go around the pipe ( about 1 inch) and is long enough to go through the lumber and have 1/2 inch extra for the nuts. The bolts can not be so long as to interfere with the mounting of the seat.
The balance point of the seat on the cart must be determined. Start with one of the 12x16 inch boards, at a 12 inch end mark the center (6 inches from one end) then center the “U” bolt on this mark. One inch in form the 12 inch side mark for holes for the “U” bolt. Drill holes for the “U” bolt and loosely mount the board on the cart. Place the seat on the board so the front edge of the seat and board are aligned. Carefully sit in the seat, and with the help of your pony to hold up the shafts to her/his waist, slide the seat forward or back until the weight of the driver is balanced on the cart. Carefully get off the seat and from the underneath side mark the location of the center “T” fitting of the seat assembly on the under side of the board. Also mark the location of the front edge of the board on the pipe to serve for reinstallation. Cut out a section of the board large enough to allow the board to clear the “T” fitting and rest on the pipes on either side of the fitting. Reinstall the board on the cart and mark for the other two “U” bolts on the sides of the board. Drill these holes.
With both boards measuring 12x16, place one board on top of the other, aline the sides and finish drilling the holes for the “U” bolts. With the holes aliened glue and screw the boards together.
Take one of the 2x12 boards and find the center of the 2 inch side. Draw a line the length of the board on the center. Measure 6 inches from the 2 inch side to locate the center of the line. Measure 2 1/2 inches on either side of the center mark. This is the location for the bolt holes. Drill the holes. Check the board with the under side of the seat to make sure the holes line up with the mounting points on the seat. Align both 2x12 boards and drill for the second board.
Measure the distance from the front of the seat to the first mounting points (on the under side of the seat). Mark this distance on the top of the 12x16 board assembly. Draw a line across the board to locate the first of the 2x12 boards. Center the holes in the 2x12 board over the line and drill for the seat mounting bolts. Measure for the second mounting points on the seat and repeat the measurement and drilling for the second 2x12 board. With the holes in the 2x12 and 12x16 boards aligned, glue and screw the boards together.
Mount the seat board assembly on the cart and bolt the seat to the assembly.

|
Page 6 of 6